# Smooth Print ラベルプリンタでの印刷

## **概要**

Smooth Print（※）を使用して、i-Reporter アプリからラベルプリントを行うことができます。

{% hint style="info" %}
（※）

Smooth Print は、「ブラザー工業株式会社 (BROTHER INDUSTRIES, LTD.)」 がリリースしているモバイル端末向け印刷仲介アプリです。

Smooth Print について、詳細は 「ブラザー工業株式会社」の製品サイトをご参照ください

▼ ブラザー工業株式会社 ＞ [Smooth Print](https://support.brother.co.jp/j/s/es/dev/ja/specific/smooth_print/index.html)
{% endhint %}

{% hint style="success" %}
本機能は、iOS版i-Reporterアプリでのみご使用いただけます。\
Windows版i-Reporterアプリでは使用できません。（Smooth Print が WindowsOSに対応していないため。）
{% endhint %}

## **ラベルデザインを行うPC（Windows）での事前設定**

ラベルデザインを行うPCに、必要なアプリケーション・ドライバなどをインストールし、各種設定を行います。

【手順】

1. 下記 『i-Reporter専用「P-touch Editor」ダウンロード』の専用申し込みフォームより「P-touch Editor（ラベルデザインツール）」を入手し、PCにインストールします。

   <div data-gb-custom-block data-tag="hint" data-style="info" class="hint hint-info"><p><a href="https://business.brother.co.jp/public/application/add/8339?__CAMCID=GCepbmkAFw-183&#x26;__CAMI=3.3.1.1.fquTGEHfD.7Y3gezEEd3Hjnsaa-97&#x26;__CAMSID=7Y3gezEEd3Hjnsaa-97&#x26;__CAMVID=fquTGEHfD&#x26;_c_d=1&#x26;_ct=1721975834556&#x26;_ga=2.264026188.15944368.1721975579-1719413390.1690187365">i-Reporter専用「P-touch Editor」ダウンロード</a> （外部サイト）</p></div>

   <div data-gb-custom-block data-tag="hint" data-style="warning" class="hint hint-warning"><p>【注意】</p><p>P-touch Editor は、必ず専用サイトより入手した 『i-Reporter専用「P-touch Editor」』をご利用ください。</p><p>上記以外の P-touch Editor を使用した場合、i-Repo DesignerでのExcel定義取込み／Excel定義出力 時に以下のようなエラーメッセージが表示されて 取込み／出力ができなくなり、Officeの修復やOfficeの再インストールが必要になる可能性があります。</p><p><img src="/files/UeGP9GkZEnqbhM2msKe0" alt=""></p></div>

   <br>
2. ブラザー工業株式会社の公式サイトより、ご使用になるプリンターの「ドライバー」 および 「プリンター設定ツール」をダウンロードし、PCにインストールします。

   <div data-gb-custom-block data-tag="hint" data-style="info" class="hint hint-info"><p><a href="https://www.brother.co.jp/">ブラザー工業株式会社 ホームページ</a></p></div>

   <div data-gb-custom-block data-tag="hint" data-style="success" class="hint hint-success"><p>プリンタードライバーのインストール手順などは、ブラザー工業株式会社へご確認ください。</p></div>

## **「テンプレートファイル（.lbx）」「用紙情報ファイル（.bin）」の作成**

ラベルデザインを行うPC（Windows）で、「テンプレートファイル（.lbx）」 および 「用紙情報ファイル（.bin）」を作成します。

{% hint style="info" %}
「テンプレートファイル（.lbx）」はi-Reporter専用「P-touch Editor」で、 「用紙情報ファイル（.bin）」は「プリンター設定ツール」で作成します。\
作成手順の詳細は、 「ブラザー工業株式会社」 のホームページをご参照ください。

▼ ブラザー工業株式会社 ＞ [Smooth Print](https://support.brother.co.jp/j/s/es/dev/ja/specific/smooth_print/index.html)
{% endhint %}

## **「テンプレートファイル（.lbx）」「用紙情報ファイル（.bin）」の送信**

作成した 「テンプレートファイル（.lbx）」 および 「用紙情報ファイル（.bin）」を出力し、i-Reporterアプリを使用するiOS端末に送信します。

{% hint style="success" %}

* 【 「用紙情報ファイル（.bin）」の出力方法 】\
  用紙サイズ設定 ＞ オプション ＞ コマンドファイルに保存
* メールでの送信、ファイル共有など、お客様環境にて実施しやすい方法にて送信してください。
  {% endhint %}

## **帳票定義の作成**

カスタムURLスキームを設定した帳票定義を作成します。\
具体的には、帳票定義内に用意した「アクションクラスター」にカスタムURLスキームを設定します。

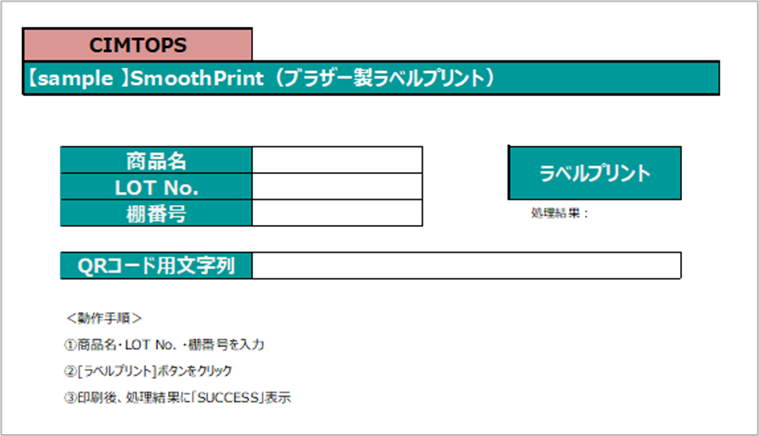
【例】下記のような帳票定義を作成し、ラベル印刷を行う場合

<div align="left"><figure><img src="/files/n48DBfbsUsGw7XdjyWLr" alt="" width="563"><figcaption><p>帳票定義の構成例</p></figcaption></figure></div>

<table><thead><tr><th width="131">クラスターindex</th><th width="122">クラスター名</th><th width="147">クラスター種別</th><th>内容</th></tr></thead><tbody><tr><td>0</td><td>商品名</td><td>キーボードテキスト</td><td>ラベル「商品名」に出力する値を入力</td></tr><tr><td>1</td><td>ラベルプリント</td><td>アクション</td><td>カスタムURLスキームを用いてラベル印刷</td></tr><tr><td>2</td><td>Lot_No</td><td>キーボードテキスト</td><td>ラベル「Lot No.」に出力する値を入力</td></tr><tr><td>3</td><td>棚番号</td><td>キーボードテキスト</td><td>ラベル「棚番号」に出力する値を入力</td></tr><tr><td>4</td><td>rtn</td><td>キーボードテキスト</td><td>ラベルプリントの返り値を格納</td></tr><tr><td>5</td><td>QRコード</td><td>計算式</td><td><p>QRコード出力用の文字列を作成</p><p>“商品名，Lot_No,棚番号”</p></td></tr></tbody></table>

以下のようなラベルフォーマットを前提にカスタムURLスキームを設定しています。

<div align="left"><figure><img src="/files/fbVcFdyp8NiChNfkf9D5" alt="" width="237"><figcaption></figcaption></figure></div>

<table><thead><tr><th width="191">項目</th><th>オブジェクト名</th></tr></thead><tbody><tr><td>商品名</td><td>txt_item_name</td></tr><tr><td>Lot_No</td><td>txt_lot_no</td></tr><tr><td>棚番号</td><td>txt_shelf_no</td></tr><tr><td>QRコード</td><td>qr_code</td></tr></tbody></table>

<table data-header-hidden><thead><tr><th width="217"></th><th></th></tr></thead><tbody><tr><td>テンプレートファイル</td><td>label_sample.lbx</td></tr><tr><td>用紙情報ファイル</td><td>bst18act.bin</td></tr></tbody></table>

※テンプレートファイル・用紙情報ファイルは、接続プリンターにより適宜ご用意ください。

【手順】

帳票定義内に「アクションクラスター」を作成します。\
i-Repo Designerにて、「アクションクラスター」の「入力パラメータ設定」画面で下記のように設定します。

* アクション種別：URLを開く
* URL：作成したカスタムURLスキーム

<div align="left"><figure><img src="/files/Ng7zjuyDNZ8yTc3VnxOT" alt=""><figcaption></figcaption></figure></div>

### **カスタムURLスキームについて**

「アクションクラスター」に設定するURL（カスタムURLスキーム）は、下記のように作成します。

```
brotherwebprint://print?filename= 【テンプレートファイル名】 & size=【用紙情報ファイル】& copies= 【出力枚数】& &successCallback=jp.co.cimtops.ireporter.setcluster:// 【返り値】 =&failureCallback=jp.co.cimtops.ireporter.setcluster:// 【返り値】 =&text_【オブジェクト名】=【入力値】&text_ 【オブジェクト名】=【入力値】&text_【オブジェクト名】 =【入力値】&barcode_ 【オブジェクト名】 =【入力値】

```

【例】

brotherwebprint://print?filename=<mark style="color:blue;">**label\_sample.lbx**</mark>\&size=<mark style="color:blue;">**bsr18act.bin**</mark>\&copies=1\&successCallback=jp.co.cimtops.ireporter.setcluster://<mark style="color:blue;">**rtn**</mark>=\&failureCallback=jp.co.cimtops.ireporter.setcluster://<mark style="color:blue;">**rtn**</mark>=\&text\_<mark style="color:blue;">**txt\_item\_name**</mark>=<mark style="color:blue;">**{1,0}**</mark>\&text\_<mark style="color:blue;">**txt\_lot\_no={1,2}**</mark>\&text\_<mark style="color:blue;">**txt\_shelf\_no={1,3}**</mark>\&barcode\_<mark style="color:blue;">**qr\_code={1,5}**</mark>

{% hint style="success" %}

* パラメーターの渡し方は、`{1,5}` のような形式にします。数値は {シート番号,クラスターindex} です。
* 以下のパラメータは、i-ReporterからSmoothPrintアプリを起動した後、i-Reporterアプリに制御を戻すために記載しています。\
  `[successCallback=jp.co.cimtops.ireporter.setcluster://rtn=&failureCallback=jp.co.cimtops.ireporter.setcluster://rtn=]`
  {% endhint %}

## **ラベル印刷**

【手順】

1. i-Reporterアプリからのラベル印刷を行うiOS端末に 「Smooth Print」 アプリをインストールします。\
   「App Store」より検索・インストールを行ってください。<br>

2. 『「テンプレートファイル（.lbx）」「用紙情報ファイル（.bin）」の送信』でiOS端末に送信した.lbxファイル および .binファイルを、 「Smooth Print」 アプリに取り込みます。<br>

3. iOS端末とプリンターを接続します。​

   * Bluetoooth接続の場合\
     iOS端末のBluetooothを有効にして、プリンターとペアリングします。
   * ネットワーク接続の場合\
     iOS端末とプリンターを同一ネットワークに接続します。

4. Smooth printアプリにて、手順2で接続したプリンターを選択します。<br>

5. &#x20;i-Reporterアプリにて、ラベルプリンタ用の帳票定義から新規入力帳票を作成します。\
   必要情報を入力の上、ラベルプリントボタン（アクションクラスター）をタップしてラベルを印刷します。

【例】　

**入力帳票**

<div align="left"><figure><img src="/files/TNG94CWrh1ps0J1VNvoB" alt="" width="563"><figcaption></figcaption></figure></div>

**印刷結果**

<div align="left"><figure><img src="/files/WuNfjX8iPOLMYtwgSqq3" alt="" width="375"><figcaption></figcaption></figure></div>

{% hint style="warning" %}
​【注意】

* Smooth Printより出力されるバーコードは、P-touch Editor のバーコードのプロパティより、エンコード（UTF-8，ShiftーJISなど）

  の指定が可能です。
* 日本語設定のバーコードを読み取る場合、読取機器に合わせて設定および検証の上ご利用ください。
  {% endhint %}

## **サンプル**

本マニュアル内で例として記載した帳票定義、「テンプレートファイル（.lbx）」  「用紙情報ファイル（.bin）」 をこちらからダウロードできます。\
設定の参考にご活用ください。

{% hint style="warning" %}
【注意】

本サンプルは、「型番：TD-4550DNWB」での印刷を前提として作成しております。\
ご利用になる場合は、プリンターの機種に合わせて 「テンプレートファイル（.lbx）」 および 「用紙情報ファイル（.bin）」 を作成の上、アクションクラスターに設定するURL内のファイル名を適宜修正してご利用ください。
{% endhint %}

{% file src="/files/J02eLi8L7deMSQPZtm9b" %}


---

# Agent Instructions: Querying This Documentation

If you need additional information that is not directly available in this page, you can query the documentation dynamically by asking a question.

Perform an HTTP GET request on the current page URL with the `ask` query parameter:

```
GET https://manuals.i-reporter.jp/connection-with-externaldevices/smooth-print.md?ask=<question>
```

The question should be specific, self-contained, and written in natural language.
The response will contain a direct answer to the question and relevant excerpts and sources from the documentation.

Use this mechanism when the answer is not explicitly present in the current page, you need clarification or additional context, or you want to retrieve related documentation sections.